Best Compressor Default Settings
Create a default template / preset for your favorite Compressor.
Why is this helping?
At the beginning of my carrier, I over-compressed my signals quite heavily. I knew what a compressor is made to do, but somehow I could not manage to get the right settings. This was because I didn’t know what parameter to adjust first. It took a while for me to figure out what works best for me. Another factor was, that in the early days I had no chance to tweak a hardware compressor. Once I did that I understood quickly why it took me ages to adjust a VST compressor.
Do I need a certain Compressor Plugin?
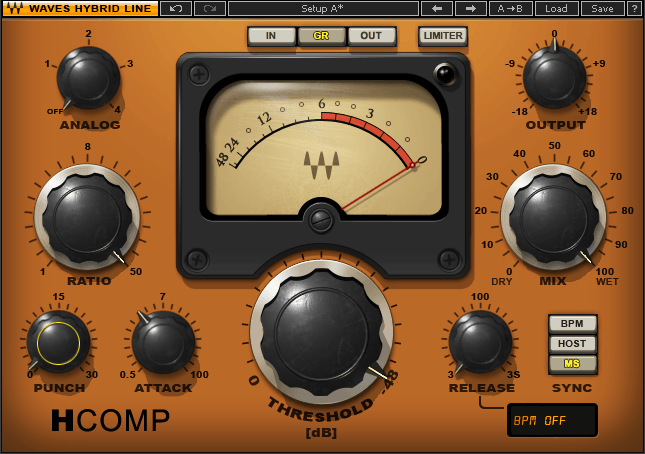
No, use whatever is provided by your DAW (Digital Audio Workstation) or anything you have purchased. My favorite compressor is the H-Comp by Waves. Why? I like the hybrid approach with the 4 Analog (Character) types to choose from and I enjoy the fact that it’s possible to set the release to the BPM of the song. The Punch option is super extra lovely to my ears. Let me also mention the dry and wet is there for a new york style of compression. If you like to know more about that style leave a comment below.
Tip: Stock compressors got really good over the years. If going 3rd party go for one that adds Character / Harmonic distortion.
What settings do you use?
I have my H-Compressor set to these defaults.
Why do I use these settings as my go-to starting point?
For me, this is the most flexible option to start using a compressor. The most important functions are enabled and set in the way needed to make it work for me. I will describe in detail the concept and use of these settings below. The other “Extra” functions are disabled and will be dialed in when needed. The H-Comp is so versatile This could be a post by itself at a different time.
How do I use this template?
Let me break this down into steps.
- Set the Threshold of your compressor to the lowest possible. (H-Comp is -48dB)
- Set the Ratio to MAX. (H-Comp is 50!)
- Set the Attack time to taste: Fast Attack is Snappy (More Transients) Slow is Dull (Transients are being tamed)
- Set the Release time: Fast is Snappy Slow is soft and you will hear the pumping a lot more due to the max threshold and ratio.
- Once you adjust your Attack and Release to taste either Snappy or Soft bring back the Threshold.
- Adjust the ratio.
Tip: You can go back and forth with the Threshold and Ratio. I Highly suggest having a hardware controller to tweak with two hands. This of course goes also with setting the Attack and Ratio together. This lets you quickly catch these wonderful transients.
Tip: Hardware controllers can be set up to default settings in all DAWs. I would suggest setting up all the needed parameters for your go-to plugins. This will speed up the process and you use the mouse less often. I’m all about hands-on tweaking.
Tip: I personally Hi and Low-pass my tracks before going into a compressor. I wrote a quick tutorial here.
What Compressor types are out there?
FET: For example the legendary 1176
This compressor is fast and very good on transient materials like Drums
Optical: For example the legendary LA-2A
This compressor is slow and clean. Very useful for Vocals, Pads, and Strings.
Variable MU (Tube): For example the legendary Fairchild
This compressor is best for Mastering. It adds a lot of character just by running thru the tubes themselves.
VCA: For example DBX 160 and API 2500
This is the most common type of compressor out there. They are allrounders and can be used on all kinds of signals.
The later mentioned API 2500 is very nice on Drums.

0 Comments