High and Low Pass Filtering Tips
Create a default template / preset for your favorite EQ for High and Low Pass Filtering.
Why is this helping?
Like with everything that is shouting to be a repetitive task for example High and Low Pass Filtering in the mixing process, I like to automate. This will speed up the process and minimize the click count of actions that I perform. Nerdy? I thought so too but an old classmate of mine during our university times wrote a thesis about how much time you can save when you optimize your workflow by using shortcuts. Measured after days or weeks it adds up to a lot of time you can save for other activities. Sadly I don’t have a link to this study, but I still remember the fun I had reading and actually experiencing it.
Simply put, shortcuts and or templates are your friends and will help a lot in the long run.
Do I need a certain EQ Plugin?
No, as mentioned above, use whatever is provided by your DAW (Digital Audio Workstation) or anything you have purchased. Back in the day I would have recommended using a CPU-friendly EQ but with the power, we have available now, this statement is not crucial anymore. All EQs out there can be used to High & Low Pass your signal.
Tip: Try getting used to one EQ before you go down the rabbit hole to find the ultimate holy grail EQ.
What settings do you use?
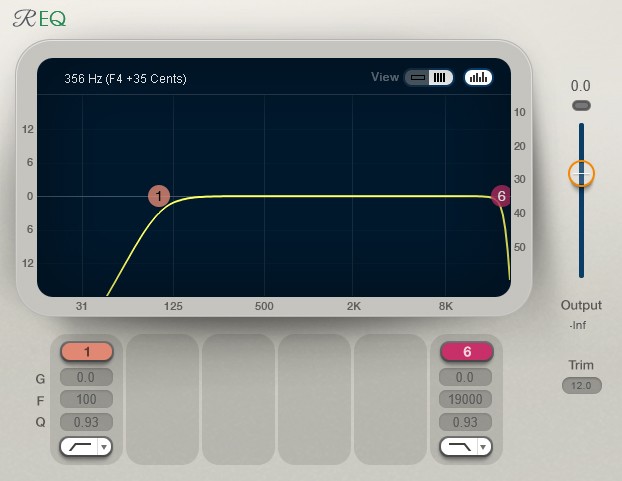
I personally set my EQ to 100Hz high-pass and 19khz low-pass
Why do I use these settings as my go-to starting point?
I slap this High and Low Pass Filter preset on all tracks apart from bass-heavy sounds (Kick & Bassline). This setting has helped me over the years to get a clean low and high-end in my mixes every time. I call this setting my “Vacuum Cleaner” Dust that clutters up in the mix suddenly disappears and lets me place instruments in the right spot in the later mixing stages.
How do I use this template?
Start by adding this to your channels one by one. Listen to the signal, if you hear a crazy bass loss (Signal sounds thin) and or the signal sounds too dull (muffled) then the settings are too extreme and need adjustments. 99% of the time this won’t occur because this default setting is gentle. If you are new to mixing I recommend using an analyzer that will show you what frequency you have successfully cut by carefully filtering out the unnecessary rumble and top end. Not that you have to use it as a fixed rule, but this will help you in the learning process.
Tip: Don’t Cut all Signals at the same frequency to minimize a build-up in that range. For example don’t leave the cut at 100Hz move it to 98, 109, or similar.
Tip: Consider High and Low Pass Filtering a bus/group instead of individual tracks.
Tip: Consider High and Low Pass Filtering before hitting a compressor.

0 Comments